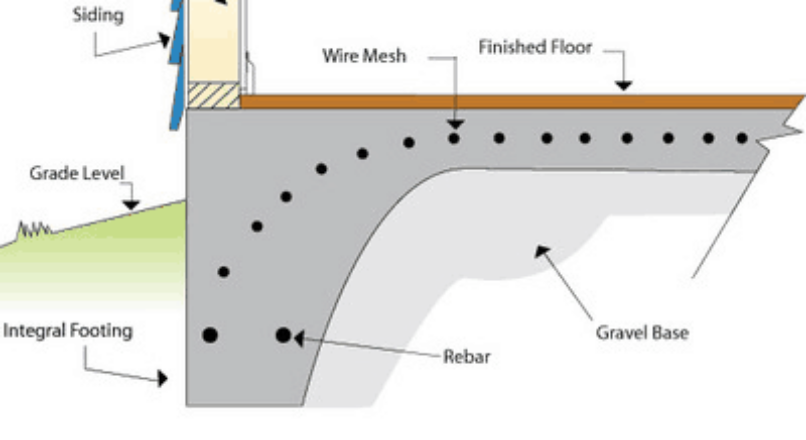
Monolithic foundations (MF)
Monolithic means “all in one pour”. This means that the footings and the floor are all poured in one shot.
How deep
A monolithic foundation is only 12 inches deep. This is measured from the bottom of the hole to the top of the floor.
Where you can use them
These types of foundations can be used anywhere in the US. However, if your house has a frost wall foundation, meaning the bottom of the footing is below the frost line, 48 inches, then you cannot connect this to your existing foundation. The reason for this is simple while your house foundation will not move up and down with the frost, your monolithic foundation will. The fact that your floor moves is just fine. Think of a sidewalk that is only a few inches thick. They move all the time.
Level Ground
For the most part, you will need a level spot to place your MF. I don’t mean super level; level by the eye should be good enough.
Digging the ground
Would you believe you can dig this foundation by hand with shovels? The total thickness is only 12 inches with only half of that in the ground. So you’re only digging down about 6 inches. However, this is if your land is 100% level. Otherwise, you will have to dig more in a few spots to keep it level.
Also, make sure you remove any grass from the center/floor.
So, what you’re trying to do is dig down about 6 inches, on all four sides, keeping each one level to the next as best as you can. Don’t worry that much. I’ll explain later how to fix it if you dig too much.
Making the forms
There are a few ways you can go about this. What I like to do is make my forms like little walls with 2×4’s and 3/4 plywood but of course, only 12 inches high. The real important part here is to make sure that you make them really strong. Concrete is very heavy and the last thing you want is a blowout! A blowout is where the forms just collapse and you’ll have concrete all over the place.
Additionally, if your one wall is 20 feet long, you should make that form 20 feet long.
Placing the stone
This can be very easy or very hard. I’ve done so many of these foundations and found that I don’t like moving the 3/4 stone needed for the base of the floor from one spot to the inside of the foundation.
So what I do when I can is to have the dump truck dump it right in the foundation. Unless you have a front loader on the job. However, in order to do this, I only dig out three of the sides first, then have the dump truck drive right in.

How much stone do you need?
This is a trick. You don’t want to buy too much. But always think of the driveway and the ramp to the garage floor. You may want to get extra for that. The best thing to do is call up whoever you’re going to get the stone from and tell them how big your FLOOR is going to be. JUST the floor, not the whole foundation. Remember, you will not be installing any stone in the footings and you’ll want about 4 inches of stone under the floor.
Rebar and mesh
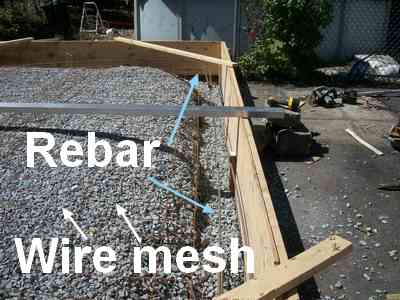
Once you have the stone in place you’ll want to rake it out nice and level and even. It’s okay for the stones to fall into the footings. Once you’ve completed this, you’re ready for a 4×4 concrete mesh. This is like a strong and always rusty fence. You’ll want to cut the mesh just a few inches shorter than the foundation itself.
Wait before you install the mesh because you’ll want to install some #4 or #5 rebar. Rebar is just metal bars. And very easy to bend manually. These will need to be placed in the footings a join each other in the corners. Don’t worry about cutting them. Just bend them around in the corners so they overlap each other and tie them together with some wire. Make sure you hold them up so they will end up in the middle of the concrete pour.
Pouring the concrete
If you’ve never poured concrete before, you may want to hire a mason to do this part. The first time is really not as easy as it may appear. You have to race against time. Concrete will be set up in an hour or so. And if you have any issues once that concrete is poured, well let’s just say you could end up with a big concrete hill as a floor.
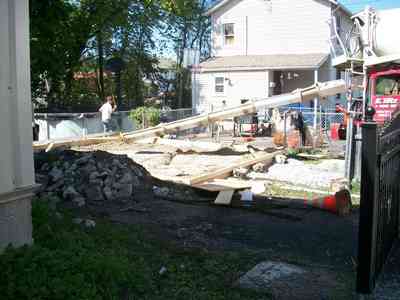
But if you’re okay with this part, let’s get started. The last thing you want to do is to start using your muscles too early in the pour. Let the concrete truck driver do the work with his truck. The driver will know what to do. You will want the driver to start pouring at the farthest point. (back wall).
I like to start to pour all the footings first with a drier, harder mix first. Bring this up to the wire mesh. Then go back and do the floor as soon as the concrete is in the footings. This way helps you to make sure the forms stay good and strong.
If you look at the above picture, you will notice a big long piece of aluminum. This is my screed. With one man on each end sliding it back and forth on top of the forms will push and pull the concrete and will make it level.
Next, you will need to use a big “float” called a “bull float” with a long handle to start the finishing. This will help with pushing the rocks down a bit. Once you have the concrete level and you’ve used the bull float, you will want to let it set up for a while until it becomes stiff; not hard and dry. Now you can go to town with a few friends using either a big gas-powered power trowel or just use hand trowels pushing down hard to bring the cream up and make it nice and smooth. If you work real hard you can make it look like glass.
Leave a reply