Introduction
Wiring and properly grounding an above-ground pool can seem like a daunting task, but it doesn’t have to be! By understanding the process and the components needed, anyone can add lighting and other accessories, and install a sub-panel for their pool pump and heater. With this DIY guide to wiring above-ground pools, you can learn all the details and take care of the entire wiring process without ever having to call in a professional.
Preparing Your Pool for Above-Ground Wiring
Before beginning the wiring process, you’ll need to make sure your pool is properly prepared. Check the sides and floor of your pool for any age-related damage and repair as necessary. Then, add foam padding to the bottom of the pool to protect the wiring as you install. Make sure that all the electrical components you will need are available, such as extension cords, junction boxes, wire, panel, and ground rods. Finally, before you begin, make sure the power supply is off to the pool.
Bucket Test
Once the pool is prepped, it’s time for you to do a quick bucket test. Don’t worry; this is easier than it sounds! Fill a bucket with water and slowly submerge it into the pool. Monitor the water level in the bucket carefully over the next few minutes; if the level doesn’t remain constant, you likely have a leak that needs to be addressed before continuing.
Check Pool Lights and Accessories
The next step is to check any lights and accessories for the pool. Even if you don’t plan on wiring lights or other accessories right away, it’s still a good idea to make sure that they are in good working condition so that you don’t have to replace them later on down the road.
Selecting the Right Electrical Components
In order to complete the wiring process, you’re going to need the right electrical components. Be sure to purchase all the components you’ll need (including extension cords, junction boxes, wire, panel, and ground rods) from a reputable supplier. Make sure to purchase components that are rated for outdoor use and follow the manufacturer’s instructions for installation. You’ll also need to make sure that the panel and ground rods are securely attached to the pool’s frame.
Types of Wires
When selecting the electrical wire needed for your above-ground pool, there are two main types to choose from:
- THWN-2 (Thermoplastic High-Heat Water-resistant Nylon-Coated): This type of wire is waterproof and designed for outdoor use with wet locations.
- USE-2 (Underground Service Entrance): This type of wire is tougher and designed for direct burial applications.
For above-ground pool wiring, we recommend using the THWN-2 wire.
Junction Boxes
Junction boxes are an essential part of your pool’s electrical setup. They house all the wires and connections, preventing moisture from compromising the integrity of the wiring. Make sure to select junction boxes that are corrosion-resistant and designed for outdoor use.
Understanding Your Pool’s Electrical Setup
Understanding how your pool’s electrical setup is arranged is important before you begin wiring. Make sure that you review the wiring diagrams for your lights and other accessories so you know the proper setup for them.
Electrical Supply Partnership
Whenever you start any kind of wiring project, you must be aware of the electrical supply that your pool is connected to. Make sure to find out the name of the electrical supply company and the exact local codes and regulations that you will need to follow.
Circuit Breakers
You will also need to ensure that your circuit breakers are all functioning properly. Faulty circuit breakers can fire unexpectedly and cause damage, so make sure that you check and test them periodically.
Installing Ground Wires and Junction Boxes
Now it’s time to get to work! You’ll need to install the ground wires and junction boxes for your above-ground pool. Make sure to follow the local codes and regulations when doing so.
Ground Wires
Ground wires need to be installed within 18″ of the pool’s floor. They must also be long enough to reach their intended destination, which typically means the electrical panel you’ll be using. Make sure to select a wire of the right size and type for the job.
Junction Boxes
Junction boxes need to be connected to the ground wires and to the pool’s main control panel. They must also be placed within 3′ of the pool, but not too close to the pool’s edge. Make sure to follow the electrical diagram for wiring the junction boxes for the pool.
Running Wires from the Electrical Supply to the Pool
Now it’s time to run the wires from your electrical supply to the pool. Make sure to select the right type of wire for the job, and remember to adhere to the local codes and regulations for the area. You’ll also need to make sure that the wires are properly secured with wire connectors and cable ties.
Using Electrical Conduit
Before you run the wires, you’ll need to install an electrical conduit. This is an easy process, and all you have to do is dig out a shallow channel for the wires to run in and then cover the conduit with dirt or gravel. Make sure to securely attach a junction box for the conduit at either end.
Maintaining Proper Clearance
You’ll need to make sure that the wires maintain the proper clearance from other objects, such as ground wires, trees, or even other pools. The minimum recommended clearance is 8″ from any other object, but it’s best to err on the side of caution and make it even larger.
Connecting Wires for Pool Lighting and Accessories
Once you have the wires running to the pool, you can begin connecting them to the lighting and other accessories. Make sure to choose the correct type of wire for the lights and accessories, such as THWN-2 or USE-2. Then, use wire connectors and cable ties to securely attach the wires to the lights and accessories.
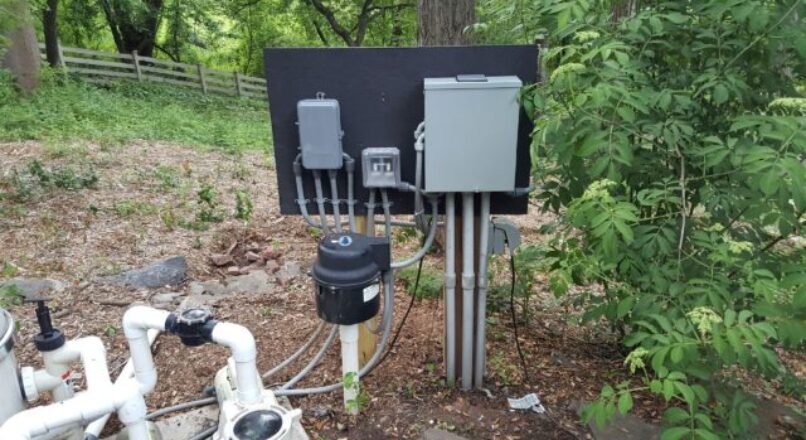
Installing a Sub-Panel for Pool Pump and Heater
For larger pools, you may need to install a sub-panel for the pool pump and heater. This is a completely separate circuit, and you’ll need to make sure that the wiring is properly secured with wire connectors and cable ties. Make sure to label each wire clearly to avoid confusion when connecting the sub-panel to the main control panel.
Mounting the Pool Junction Box and Sub-Panel
Now that the wiring is complete, you’ll need to mount the junction box and sub-panel. Make sure to follow the manufacturer’s instructions for both, and use the proper hardware to secure them in place. Make sure that they are mounted in a secure area away from any debris or dirt.
Securing Wiring Against Damage and Corrosion
In order to keep the wiring for your above-ground pool safe from damage or corrosion, you’ll need to take some extra steps. Make sure that all the wires and components are securely attached, and that any exposed wires are covered with a durable material.
Testing Your Above-Ground Pool Wiring
The last step is to test and make sure that all the wiring is functioning properly. Make sure to test each connection before turning on the power supply. Leave it running for at least 10 minutes to make sure that all the components are working as intended.
Conclusion
Wiring and properly grounding an above-ground pool doesn’t have to be a huge headache. With the right electrical components and a little know-how, anyone can tackle the task with ease. By following this DIY guide, you can have your pool wired, grounded, and ready for use in no time!
Leave a reply