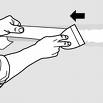
I see way too many homeowners just screwing this one up because they are trying too hard. Let’s just talk about mending a simple hole in the wall. I recommend never using that self-stick tape or the mesh-looking stuff. This stuff is for kids. The regular flat tape is what you want. to get the best-looking results.
 This is what it looks like.
OK, when it’s time for the joint compound, be sure to use a nice, clean 5 or 6-inch taping knife. Apply a nice amount to the knife, not so much that it’s falling off and all over the floor, but enough. Coat the area with about 1/6 to 1/8 thick of compound. Don’t worry about putting too much on. Now unroll a piece of tape big enough to cover the area making sure to cover at least two inches more on each end.
 This is what you’re going to do now. With the knife on about a 45-degree angle spread the mud (compound), making the tape lay flat and squeezing the mud out. Return the mud to the bucket making sure you didn’t leave any chunks behind. DONE. Don’t touch it anymore. This is where everyone screws it up by putting on too much and try too hard. You are going to do this two more times. Once more with the same knife and the last time with a 10 inch knife.
Second coat. Now, in the same way, you did it yesterday, yes you have to let it dry a full day. I mean, if you want to look good, you do. A nice amount of mud now spread over the whole area and extends way beyond the patched area. If you don’t, it will always look like a patch. Start from the inside of the area and work your way out. Think like this; hold the knife flat to apply, and on an ever so slight angle to remove the excess mud. This is somewhat hard, but you can do it, you’re not in a rush are you, LOL.
Third and final coat. You’re going to do it pretty just the same way that you did it yesterday. Yes, it does take days to do it right. But this time, you will use the 10-inch knife. This coat is called a skim coat. What you’re doing is covering knife marks from the previous coats and really just giving it a much better, smoother finish. If you’re good enough here, you won’t even need much sanding. Just remember, don’t try too hard and whatever you do put on, knife it off and leave until it dries.
Sanding: A really good taper won’t have to sand at all – or not very much. OK, we all need to sand, it just depends on how much. With Sheetrock sandpaper or a Sheetrock sanding sponge, sand very little, making sure the sanding block is very flat against the wall, don’t worry about smooth – that’s what paint is for. You’ll know when you’re finished sanding because your work will look nice and flat.
Finishing: With all that sanding you just did, you’ll notice all that dust is left behind on the walls. It’s very important that you remove this dust before applying your first coat of primer. To remove the dust, use a dry rag or fine bristled broom to dust off the surface. Then, apply your primer and paint and you’re done!

I remember seeing the Video on how to tape sheetrock by
Dominick but can’t seem to locate it now and wanted to show it to my son, could you repost it again.
You know I have so many videos I forget what I have and don’t have. I just checked and I have how to tape corners, fix holes but not one on just taping. I’ll get right on it. But here use this link to see what I have.https://www.askmediy.com/category/indoor/sheet-rock/